DialF: Drive a Real Phone From Your Terminal

A small tool that lets a script place real phone calls, talk, listen, and hang up — on a real SIM, over a real cellular network.


Why we built this

AI voice agents are everywhere now — and they live and die by latency and audio quality. A second of dead air, a stiff robotic voice, or choppy, fluctuating audio is the difference between “sounds human” and “obviously a bot.” Yet before every release we were measuring those things by hand: dial in, read a script, listen for gaps, do it again on the next build. It didn’t scale, and “sounds fine to me” is not a regression test.

What we actually needed was to automate a real phone call. Not a VoIP call. Not a simulator. An actual call on an actual carrier — the kind that rings a normal phone, goes through the normal network, and behaves exactly like a human dialing. So we could:

  • Test phone systems end to end — voice agents, IVRs, call centers, voicemail — the way a real caller experiences them.
  • Run scripted conversations — play a prompt, wait for the other side to finish talking, play the next one.
  • Record both sides cleanly, on one timeline, so we could measure latency (“how long after I speak does the other side respond?”) — as a number, on every build.

The catch: Android won’t let an app record or inject the audio of a cellular call. That path is locked to the system. So a pure software approach is impossible.

DialF’s answer is simple and a little old-school: bridge the call audio through a real USB sound card. The phone does the dialing; a sound card plays into the phone’s mic and listens on its earpiece. Your computer drives the whole thing — and we know you’ll wire your own AI agents up to do the driving.


Why not a programmable 4G module?

It’s the first thing every engineer suggests, and it’s a fair instinct — a cellular module takes a SIM, speaks AT commands, and dials from a script. Cheap, headless, no human in the loop.

But a module isn’t a phone. It carries its own compatibility quirks and behaves in ways real handsets don’t — so it can quietly alter the very thing you’re trying to measure. You end up testing the module’s behavior, not your users’ calls.

That’s the crux: a voice agent’s audio path is the product, and a module only tests a synthetic version of it. Your agent can sound flawless through a module and still ship stutter and echo through a real earpiece — and the module never warns you, because it was never on the path your callers actually hear. DialF drives a real phone for exactly that reason.


What it does

DialF turns a phone into something you can script:

  • 📞 Make, answer, reject, and hang up calls — on the phone’s own SIM.
  • 💬 Send and read SMS, read the call log and SIM list (dual-SIM aware).
  • 🎛️ Carrier controls — toggle voicemail, run raw MMI/USSD codes.
  • 🗣️ Scripted voice conversations — play audio prompts, and wait for the person to stop talking using voice-activity detection before moving on.
  • 🎙️ Record the call full-duplex — your audio (tx), their audio (rx), and a stereo mix (left = you, right = them), all the same length and sample-aligned (great for latency analysis).

You drive all of it from one command-line tool, or from a small YAML script.


How it works

DialF has two parts that talk to each other, plus a deliberate split between control and audio:

flowchart TB
  subgraph Host["Your computer"]
    CLI["dialf (CLI)"]
    D["dialfd (daemon)"]
    Card["USB sound card"]
  end
  subgraph Android["Android phone"]
    App["DialF Phone app"]
  end

  CLI -->|commands| D
  D <-->|"WiFi · WebSocket"| App
  D <-->|"audio in / out"| Card
  Card <-->|"headset cable"| App
  App -->|"dials / answers on its SIM"| Net(("Cellular network"))
  • Control plane (over WiFi): the dialf CLI sends commands to the dialfd daemon, which relays them to the DialF Phone app over a WebSocket. This is how dial / answer / SMS / hang up happen. No audio travels here.
  • Audio plane (physical): call audio flows through a USB sound card wired to the phone’s headset jack. The card plays into the phone’s microphone and records from its earpiece. The app just routes the call to the wired headset.

Why the split? Because Android blocks call-audio capture in software — so audio has to be bridged physically, never over WiFi.

A scripted call, step by step

sequenceDiagram
  participant CLI as dialf CLI
  participant D as dialfd
  participant P as DialF Phone
  participant F as Far end

  CLI->>D: run call-script.yaml
  D->>P: dial +1...
  P->>F: ringing…
  F-->>P: answers
  P-->>D: call active
  Note over D: call.wait_answered satisfied
  D->>P: play prompt (out the sound card → phone mic)
  P->>F: far end hears the prompt
  F-->>P: spoken reply (phone earpiece → sound card)
  P-->>D: reply audio captured
  Note over D: VAD waits for the reply to finish
  D->>P: play next prompt … then hang up

How to use it

1. Install the CLI (macOS or Linux)

npm install -g @agora-build/dialf
# or:  curl -fsSL https://dl.agora.build/dialf/install.sh | bash

Then start the background daemon:

dialf service install --user      # runs dialfd at login

On a Mac or laptop, keep --user — it runs as you, when you log in (needed so it can reach the sound card and mic). Use plain dialf service install (with sudo) only on a headless Linux server that should start at boot.

2. Install the phone app

Sideload the APK on the Android phone (Android 9+):

Open it, grant phone/SMS permissions, and set it as the default dialer (that’s what lets it place and track calls).

3. Pair them

In the app, enter the same shared key as your dialfd config and tap Start service. The phone finds the daemon automatically on your WiFi (mDNS). Confirm it’s connected:

dialf devices        # your phone should appear

4. Drive it

dialf call dial   <phone> +15551234        # place a call
dialf call hangup <phone>                  # hang up
dialf sms  send   <phone> +15551234 "hi"   # send a text
dialf call list   <phone> --human          # read the call log
dialf --version                            # CLI + daemon versions

5. Script a conversation

Jobs are plain YAML — a list of steps run in order:

- type: call.dial
  number: "+15551234"
- type: call.wait_answered      # wait for a real answer, not a fixed timer
  timeout_ms: 30000
- type: audio.play              # inject a prompt into the call
  file: samples/prompt-en-1.wav
- type: audio.wait_for_speech   # listen until the other side stops talking
  end_timeout_ms: 45000
  silence_duration_ms: 3000
- type: sms.send
  to: "+15551234"
  body: "thanks!"
- type: call.hangup
dialf run call-script.yaml

audio.wait_for_speech is the clever bit: it runs voice-activity detection on the incoming audio, so the script moves on when the person actually finishes speaking — not after a guess.


Recording and latency

If you turn on recording, every call is written as three aligned WAV files:

  • …-tx.wav — what you sent (your prompts), mono
  • …-rx.wav — what the far end said, mono
  • …-mix.wavstereo: left = tx (you), right = rx (them), so the two voices stay separated (swap with mix_channels: rx_tx)

They’re captured on a single clock, so they line up sample-for-sample. That makes latency measurable: cross-correlate tx against rx and the offset is your round-trip delay.

flowchart LR
  TX["tx.wav · your prompt"] --> MIX["mix.wav · stereo · L=tx R=rx"]
  RX["rx.wav · far-end reply"] --> MIX
  TX -.->|"cross-correlate"| RX
  RX --> L["latency = the lag between them"]

Wrapping up

DialF is a thin, scriptable bridge between your terminal and a real phone. The control side is clean software over WiFi; the audio side is honest about hardware — a sound card doing what software isn’t allowed to. Together they let a few lines of YAML place a call, hold a conversation, and hand you a clean recording.

It runs on macOS and Linux, the CLI installs from npm, and the phone app is a sideloadable APK. If you’ve ever wanted to put a real phone call inside a for loop — that’s the idea.


License

DialF is released under the MIT License.

Disclaimer: This tool is strictly for engineering use only and must not be used for any illegal purposes. The user bears all legal consequences arising from its use.
Jshell 启动错误 build 9-ea+121

Exception in thread "main" java.lang.InternalError: Launching execution engine threw: Failed remote launch: com.sun.jdi.CommandLineLaunch (defaults: home=/Library/Java/JavaVirtualMachines/jdk-9.jdk/Contents/Home, options=, main=, suspend=true, quote=", vmexec=java) -- {home=home=/Library/Java/JavaVirtualMachines/jdk-9.jdk/Contents/Home, options=options=, main=main=jdk.internal.jshell.remote.RemoteAgent 57696, suspend=suspend=true, quote=quote=", vmexec=vmexec=java}
at jdk.jshell.JShell.executionControl(jdk.jshell@9-ea/JShell.java:714)
at jdk.jshell.Unit.classesToLoad(jdk.jshell@9-ea/Unit.java:275)
at jdk.jshell.Eval.lambda$compileAndLoad$15(jdk.jshell@9-ea/Eval.java:580)
at java.util.stream.ReferencePipeline$7$1.accept(java.base@9-ea/ReferencePipeline.java:269)
at java.util.ArrayList$ArrayListSpliterator.forEachRemaining(java.base@9-ea/ArrayList.java:1477)
at java.util.stream.AbstractPipeline.copyInto(java.base@9-ea/AbstractPipeline.java:484)
at java.util.stream.AbstractPipeline.wrapAndCopyInto(java.base@9-ea/AbstractPipeline.java:474)
at java.util.stream.ReduceOps$ReduceOp.evaluateSequential(java.base@9-ea/ReduceOps.java:913)
at java.util.stream.AbstractPipeline.evaluate(java.base@9-ea/AbstractPipeline.java:234)
at java.util.stream.ReferencePipeline.collect(java.base@9-ea/ReferencePipeline.java:511)
at jdk.jshell.Eval.compileAndLoad(jdk.jshell@9-ea/Eval.java:581)
at jdk.jshell.Eval.declare(jdk.jshell@9-ea/Eval.java:441)
1 127.0.0.1 Hais-MacBook-Pro
at jdk.jshell.Eval.processMethod(jdk.jshell@9-ea/Eval.java:372)
at jdk.jshell.Eval.eval(jdk.jshell@9-ea/Eval.java:127)
at jdk.jshell.JShell.eval(jdk.jshell@9-ea/JShell.java:393)
at jdk.internal.jshell.tool.JShellTool.processCompleteSource(jdk.jshell@9-ea/JShellTool.java:2114)
at jdk.internal.jshell.tool.JShellTool.processSource(jdk.jshell@9-ea/JShellTool.java:2102)
at jdk.internal.jshell.tool.JShellTool.processSourceCatchingReset(jdk.jshell@9-ea/JShellTool.java:789)
at jdk.internal.jshell.tool.JShellTool.run(jdk.jshell@9-ea/JShellTool.java:769)
at jdk.internal.jshell.tool.JShellTool.startUpRun(jdk.jshell@9-ea/JShellTool.java:706)
at jdk.internal.jshell.tool.JShellTool.resetState(jdk.jshell@9-ea/JShellTool.java:663)
at jdk.internal.jshell.tool.JShellTool.start(jdk.jshell@9-ea/JShellTool.java:483)
at jdk.internal.jshell.tool.JShellTool.start(jdk.jshell@9-ea/JShellTool.java:462)
at jdk.internal.jshell.tool.JShellTool.main(jdk.jshell@9-ea/JShellTool.java:452)
Caused by: java.lang.InternalError: Failed remote launch: com.sun.jdi.CommandLineLaunch (defaults: home=/Library/Java/JavaVirtualMachines/jdk-9.jdk/Contents/Home, options=, main=, suspend=true, quote=", vmexec=java) -- {home=home=/Library/Java/JavaVirtualMachines/jdk-9.jdk/Contents/Home, options=options=, main=main=jdk.internal.jshell.remote.RemoteAgent 57696, suspend=suspend=true, quote=quote=", vmexec=vmexec=java}
at jdk.internal.jshell.jdi.JDIConnection.reportLaunchFail(jdk.jshell@9-ea/JDIConnection.java:353)
at jdk.internal.jshell.jdi.JDIConnection.launchTarget(jdk.jshell@9-ea/JDIConnection.java:319)
at jdk.internal.jshell.jdi.JDIConnection.open(jdk.jshell@9-ea/JDIConnection.java:120)
at jdk.internal.jshell.jdi.JDIEnv.init(jdk.jshell@9-ea/JDIEnv.java:49)
at jdk.internal.jshell.jdi.JDIExecutionControl.jdiGo(jdk.jshell@9-ea/JDIExecutionControl.java:425)
at jdk.internal.jshell.jdi.JDIExecutionControl.start(jdk.jshell@9-ea/JDIExecutionControl.java:95)
at jdk.jshell.JShell.executionControl(jdk.jshell@9-ea/JShell.java:712)
... 23 more
Caused by: com.sun.jdi.connect.VMStartException: VM initialization failed for: /Library/Java/JavaVirtualMachines/jdk-9.jdk/Contents/Home/bin/java -Xdebug -Xrunjdwp:transport=dt_socket,address=Hais-MacBook-Pro:57697,suspend=y jdk.internal.jshell.remote.RemoteAgent 57696
at com.sun.tools.jdi.AbstractLauncher$Helper.launchAndAccept(jdk.jdi@9-ea/AbstractLauncher.java:193)
at com.sun.tools.jdi.AbstractLauncher.launch(jdk.jdi@9-ea/AbstractLauncher.java:132)
at com.sun.tools.jdi.SunCommandLineLauncher.launch(jdk.jdi@9-ea/SunCommandLineLauncher.java:225)
at jdk.internal.jshell.jdi.JDIConnection.launchTarget(jdk.jshell@9-ea/JDIConnection.java:312)
... 28 more

https://bugs.openjdk.java.net/browse/JDK-8131029

这个问题在新版的已经被修复了,但是如果碰到了,可以修改 /etc/hosts 来绕过(增加一个本地计算机名字的 loop ip)

本地计算机名字可以用

uname -n

来查看

参考这个文章找到的 workaround

Tips about Android Studio

还是开一篇记录Android Studio有关的各种诡异问题。
首先感谢一下,一直以Preview状态出现的AS最近终于是Beta了,普天同庆!
AS有好也有不好,但是感觉就是用了它就回不去Eclipse了。

之前基本在版本升级的时候都会或多或少出现点问题,有的坑了很久,记录分享下,避免在这上面浪费时间!

1. 一直提示refreshing/configure project,很长时间都不会结束。
经过观察这个是在现在一些依赖包,有800多M,网速慢的话估计很难等到下载完成的时候。有个解决办法就是在Preferences当中选择Gradle为Offline work模式。
当然也可以全局配置Offline work,打开$HOME/.gradle/init.gradle,如果没有该文件就创建一个,然后在里面添加

allprojects {
    repositories {
        .......
    }

    gradle.startParameter.setOffline(true)
}

主要就是这句gradle.startParameter.setOffline(true)啦,不是很明白的可以去网络上搜索了解下,
http://www.gradle.org/docs/current/userguide/init_scripts.html
http://www.gradle.org/docs/current/javadoc/org/gradle/StartParameter.html
如果发现创建项目之后,已经处于这种卡住的状态,可以断开网络链接,一会儿这种卡住状态就会消失了。

2. 2014-07-01 10:24:55,919 [1292862] INFO – .project.GradleProjectImporter – The project is using an unsupported version of the Android Gradle plug-in (0.11.2)
鼠标移动到build.gradle当中的classpath值上面,根据提示修改就可以

    dependencies {
        classpath 'com.android.tools.build:gradle:0.11.+'
    }

然后执行gradlew clean assembleDefaultFlavor或者直接clean build工程,应该就可以解决。

3. 还有个东西叫做代理,关键的时候可以用上。

Building Android apps with Jenkins CI

在前东家,工程相关的都有专门的组来做,比如自动化的代码审查,编译,发布,测试,缺陷追踪等等系统。。。甚至当时就有人说就XXX的很多系统,即使司龄很大的员工都不一定都能使用的很熟练,因为实在是太多了。。。相反的是现在都没有,万事都需要自己动手,不过也还好,可以挑选些真的是非常有帮助的自动化系统来帮助我们提高工作效率(比如之前我一直都是不大记住写周报,其实我觉得那应该是小时报,不过还好,我当时的老大和部门经理对这个要求没有那么严格,我也不是偷懒的员工,所以基本是马马虎虎过了,但是我还是比较喜欢例如某些任务管理系统,用任务管理系统主要是防止自己忘记,一些大任务可以拆分成小任务,并且标记完成状况,或者是你在任务上撰写出你自己的意见/建议和老大进行沟通),今天就以自动化编译系统为起点来逐步搭建/定制出一个比较理想的持续集成系统。。。当然这是一个长期的任务,不是说它非常难,只是自己时间也不是特别多,会先挑些目前比较重要的东西来加入进来(building,lint,findbugs,monkey)。。。
今天先说编译系统,而且先是看基于Ant的,假设源码是放在GitHub上,比如https://github.com/guohai/and-expandable-listview/这个项目,我希望我的系统在每隔一定时间或者每次代码提交之后自己启动一次编译,第一这可以排错,防止开发人员不小心漏提交代码,或者merge代码的时候出错,尽早的发现这类比较低级的错误,编译系统编译失败会立刻邮件通知你,而不是你在本地编译测试了很多遍,信心满满的把代码提交(当然有人说会有人工代码审查,但是人工也不一定能发现所有错误,特别是编译错误),回家睡觉了,另外一个时区的同事刚开始新的一天,检出你的代码,发现根本编译不通过,那么他是该打你的电话叫醒你修改代码呢?还是等你第二天来修改呢?明显他两样都不想,所以最好是你保证自己提交的代码都是至少可以编译通过的(会有人说这么简单的事情会做不到吗?事实是当你很多人协同工作的时候,这个事情确实是有可能发生,很多次在XXX公司经历过一两天编译系统无法出一个可以通过的版本,当然这不是在黑前东家,只是事情确实有,而且公司也在逐步改用好一点的编译方式减少这种一个编译错误导致整个系统都无法编译出ROM的窘境);第二这个可以利用一些工具直接将编译的成果推送到自动化测试的服务里面完成基础的自动化测试,这样岂不是很好,减少些不必要的人工操作;第三有权限的人可以随时下载一个他需要的版本程序来安装运行,而不需要让你给他邮件发一个版本或者他自己安装编译环境,检出代码来完成编译。可能还有很多理由来需要这样一个系统,不过这里已经够了。。。
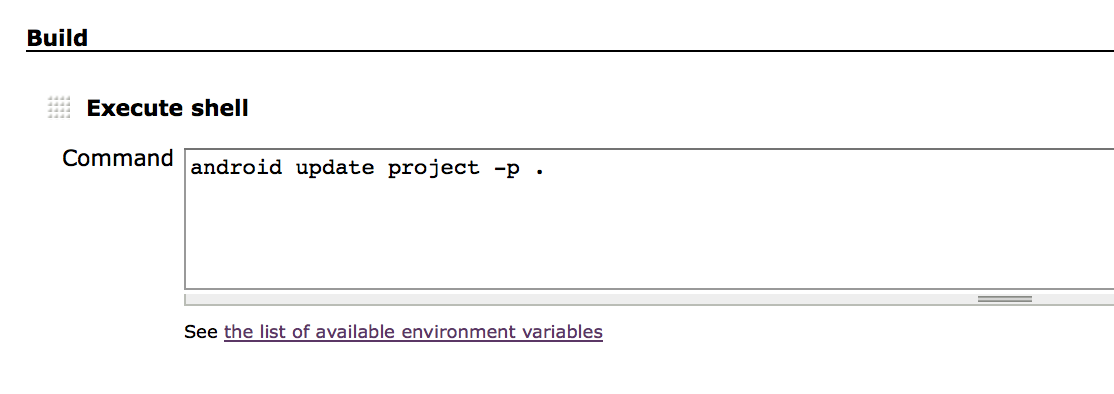
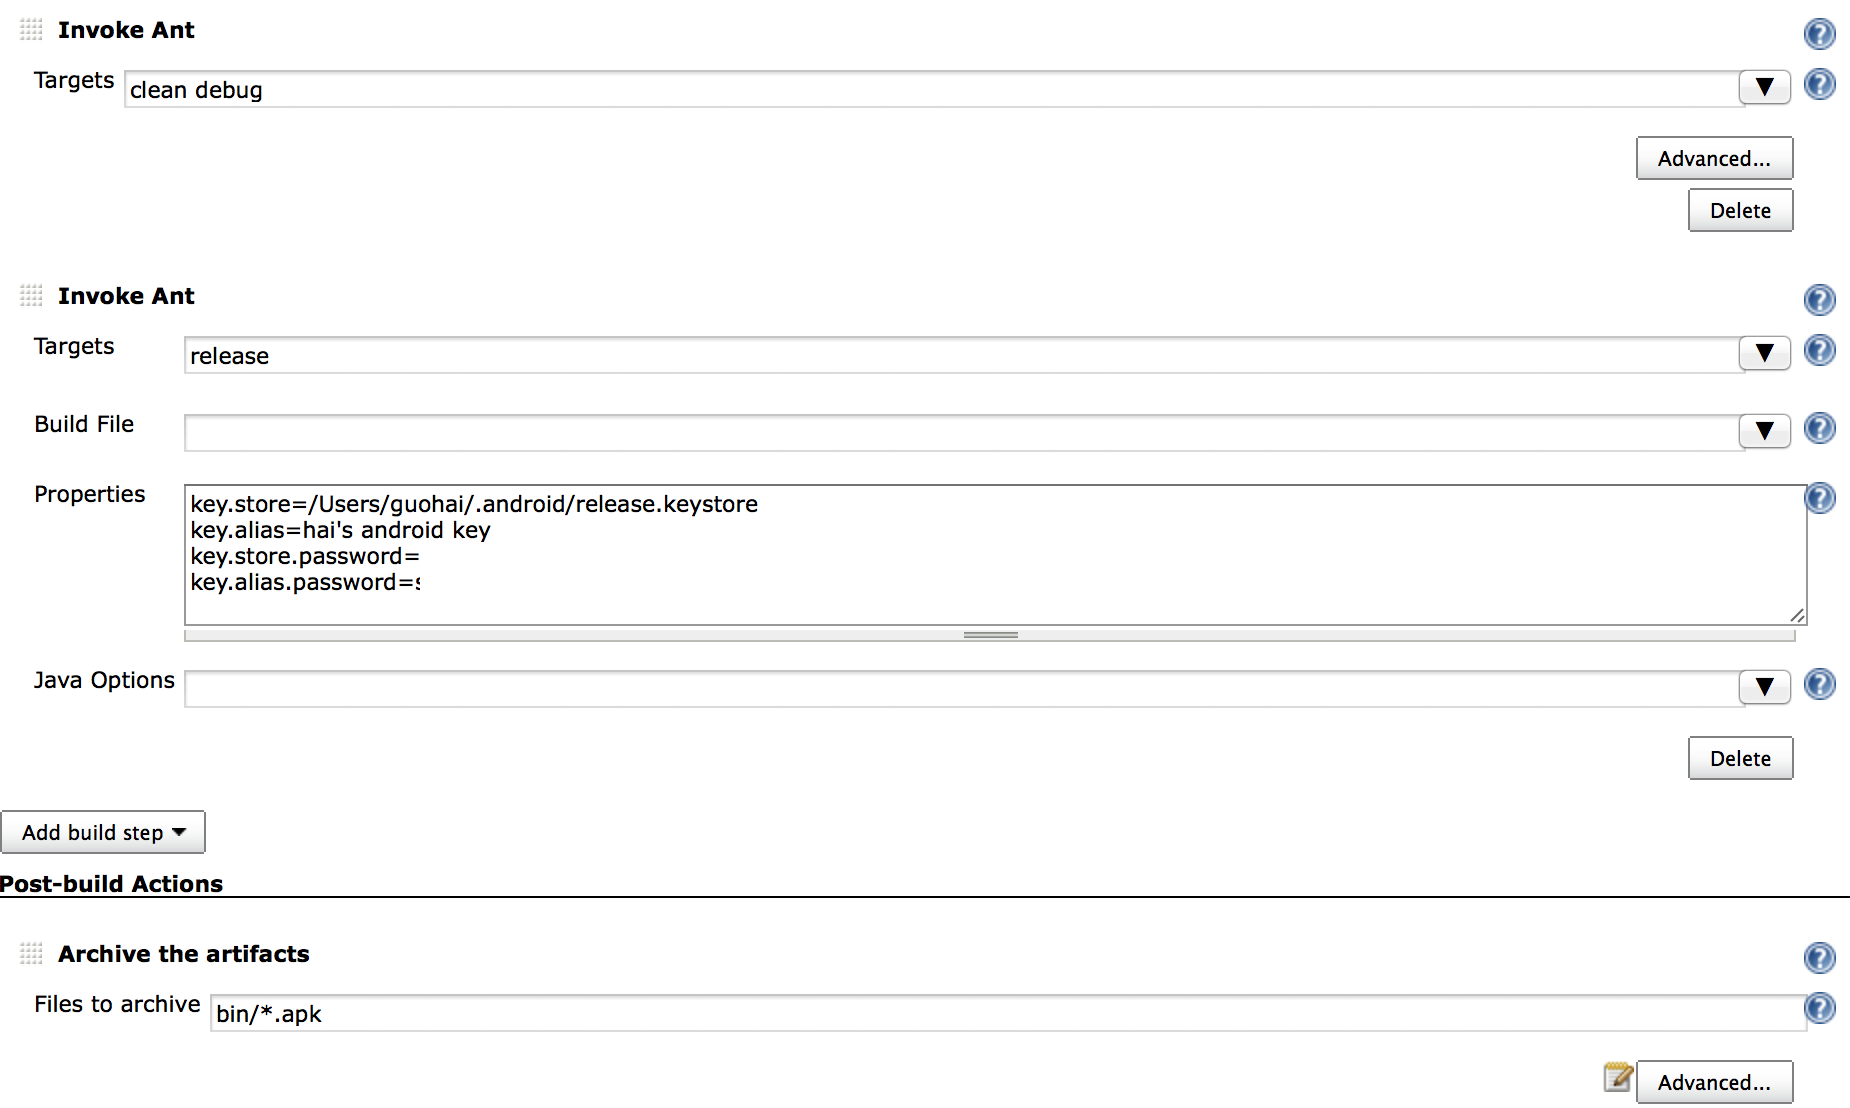
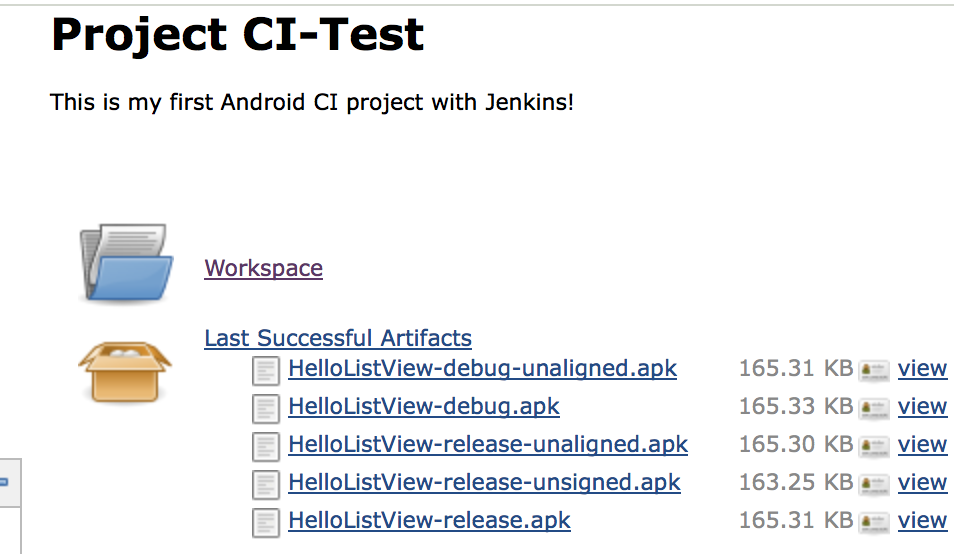
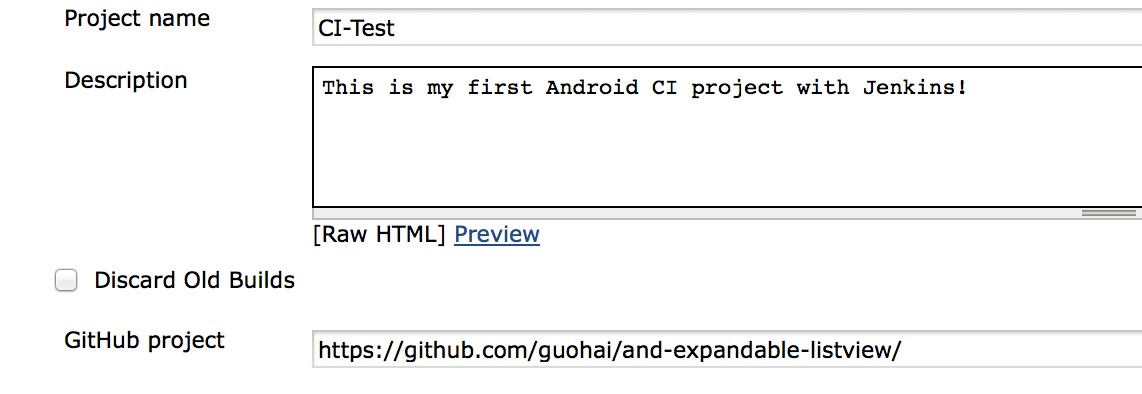
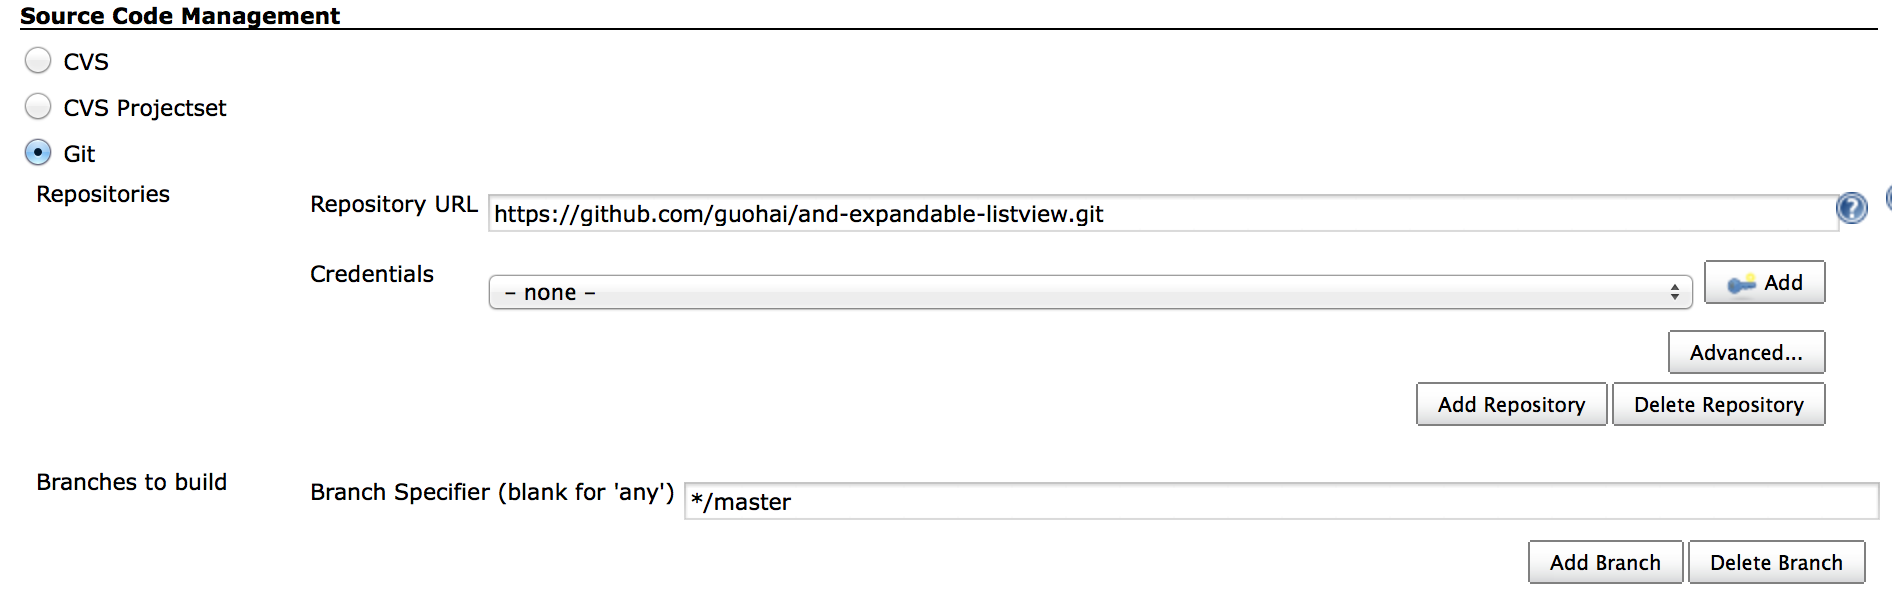
Jenkins的安装,基本使用就不说了,具体查看https://wiki.jenkins-ci.org/display/JENKINS/Use+Jenkins上面,我这里主要安装了一个GitHub插件,在Manage Jenkins->Manage Plugins当中可以很方便的完成,因为我本地都有Android SDK, Ant, Java等等一些基础环境,而且这些都已经在PATH当中,所以集成起来就很简单。然后就是创建任务, Jenkins当中称为job,然后就是配置该job,比如GitHub项目位置,仓库地址,keystore for release build,编译预处理,归档编译产物,以及触发编译条件,如下图:
Screen Shot 2014-01-27 at 12.00.47 AM
Screen Shot 2014-01-27 at 12.01.53 AM
Screen Shot 2014-01-27 at 12.14.36 AM
Screen Shot 2014-01-27 at 12.15.05 AM
Screen Shot 2014-01-27 at 12.34.11 AM
Screen Shot 2014-01-27 at 12.43.14 AM
这样就基本可以搭建出一个自动化的编译系统了,后面有机会来研究下基于Gradle的,毕竟这才是Google目前主导的方向。
当然你可以根据自己的需要调节更改配置来达到想要自己的目的,比如GitHub有提交就触发编译,只归档特定名字的文件等等,是否删除原有归档,如果新的版本有成功编译出来的话,等等可能还有更多的技巧。

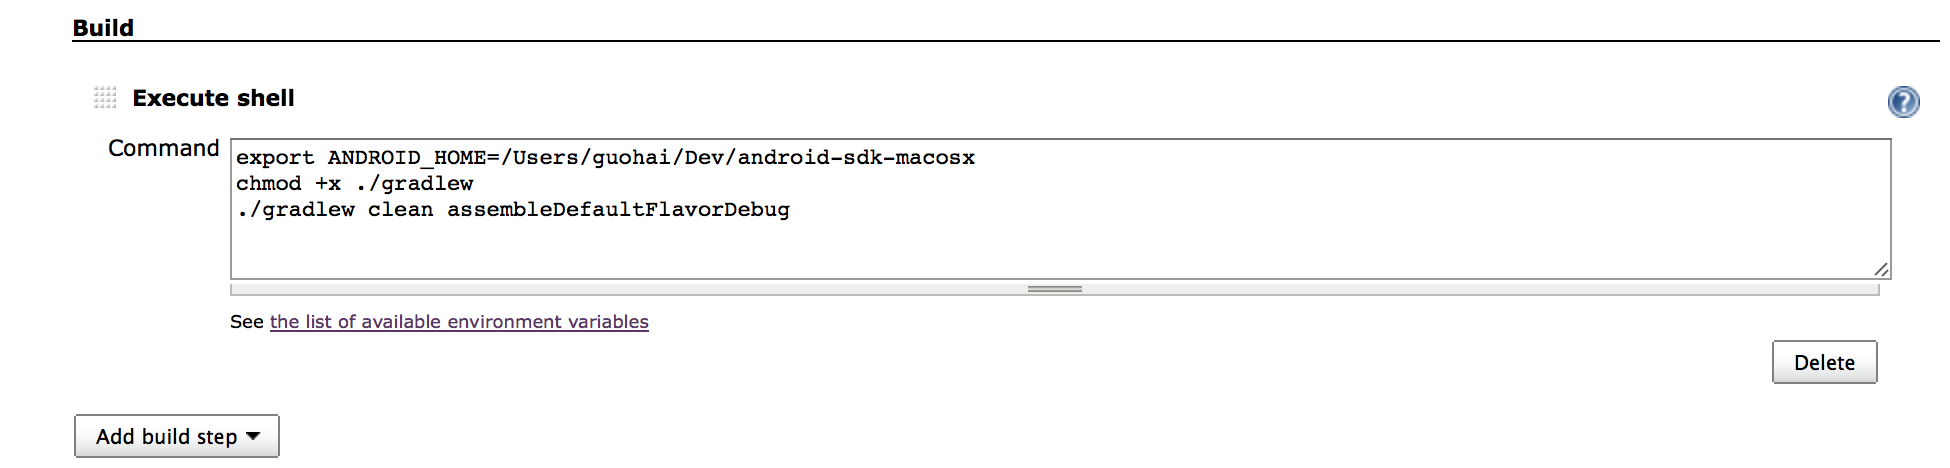
洗完个澡,顺便试了下Gradle的,你可以在Jenkins当中下载Gradle插件,也可以不用专门下载,自己写个简单的脚本完成,比如我这里就是:
Screen Shot 2014-02-06 at 12.25.49 AM
而且也只有上述这一段不一样,其他都跟Ant的基本类似,不过生成需要归档的apk的路径可能需要改改,这里有个硬编码的ANDROID_HOME,目前没有发现比较好的解决方法,如果您知道如何解决,不吝赐教。在Ant版本中,我们sdk.dir是通过android update project生成的,但是在Gradle的项目当中似乎无法生成,没有SDK路径就会编译出错,比如:

* Where:
Build file '/Users/guohai/.jenkins/jobs/Gradle-Proj-Test/workspace/xxx/build.gradle' line: 9

* What went wrong:
A problem occurred evaluating project ':beckon'.
> SDK location not found. Define location with sdk.dir in the local.properties file or with an ANDROID_HOME environment variable.
于是就先硬编码这个ANDROID_HOME变量先跳过这一问题,有空再来研究看看。
[bash]
export ANDROID_HOME=/Users/guohai/Dev/android-sdk-macosx
chmod +x ./gradlew 
./gradlew clean assembleDefaultFlavorDebug

当然这gradlew后面跟的task可以自己调整,比如debug版本或者release版本,或者编译子项目(./gradlew :sub-project:clean,sub-project就是实际子项目的名字)。

P.S.
通知邮件发送使用Jenkins Email Extension Plugin
不过在配置的时候出现
501 mail from address must be same as authorization user
参考http://bbs.csdn.net/topics/390353671设置System Admin e-mail address就可以了。

Updated at 2015.12.25
升级到最新版本之后出现即使代码没有改变,也不停的出 Started by SCM
https://issues.jenkins-ci.org/browse/JENKINS-17614
这是一个 bug,我这里导致的原因,是有多个 branch 的名字包含 develop,然后进行 branch 指定的时候,指定 develop 就分不清了。
删掉或者改名 branch 就可以正常工作了。

另外在 headless 的服务器上下载 Android SDK ,如果只想下载/更新指定的包,那么请参照这里。
http://tools.android.com/recent/updatingsdkfromcommand-line
简单来说先通过

$ android list sdk

查看有哪些更新
然后指定需要安装的包

android update sdk --no-ui --filter tools,3,8

不清楚的可以

android update sdk --help

看一下

比如强制使用 http 协议列出所有更新(包括已废弃的)

android list sdk --no-https --all

注意,调用更新的时候也要带 –all 参数,否则编号会错乱

Python连接MySQL数据库

UPDATE: 其实目前没有用到多少Python知识来写,基本都是直接调用的已有的命令来完成备份和邮件通知功能 @@
为了写个简单的备份程序,我决定使用Python来实现,几年前有看过点Python,今天就来试试看。通常我们连接数据库会用到对应的连接API,比如Java的JDBC(Java_Database_Connectivity‎),顶多中间增加个连接池之类的,因为我们这里很简单,所以只需要一个类似的API,我们这里用MySQL-python来完成。先安装这个东西,我采用1.2.3版本,当然我这里宿主机器是CentOS。

[guohai@Knight-on-the-Cloud installation]$ wget http://sourceforge.net/projects/mysql-python/files/mysql-python/1.2.3/MySQL-python-1.2.3.tar.gz/download
[guohai@Knight-on-the-Cloud installation]$ tar xvf MySQL-python-1.2.3.tar.gz
[guohai@Knight-on-the-Cloud installation]$ cd MySQL-python-1.2.3

vim site.cfg

# The path to mysql_config.
# Only use this if mysql_config is not on your PATH, or you have some weird
# setup that requires it.
mysql_config = /usr/bin/mysql_config

正如这上面所说,之前我安装MySQL有改动默认位置,所以这里要单独指定下。

[guohai@Knight-on-the-Cloud MySQL-python-1.2.3]$ python setup.py build

if errors(“no setuptools”) showing

cd ..
wget https://pypi.python.org/packages/2.6/s/setuptools/setuptools-0.6c10-py2.6.egg --no-check-certificate
sh setuptools-0.6c10-py2.6.egg

然后

cd MySQL-python-1.2.3

[guohai@Knight-on-the-Cloud MySQL-python-1.2.3]$ python setup.py build

if errors(“Python.h: No such file or directory”) showing

[root@Knight-on-the-Cloud installation]# yum -y install python-devel

继续

[guohai@Knight-on-the-Cloud MySQL-python-1.2.3]$ python setup.py build
running build
running build_py
copying MySQLdb/release.py -> build/lib.linux-x86_64-2.6/MySQLdb
running build_ext
building '_mysql' extension
gcc -pthread -fno-strict-aliasing -O2 -g -pipe -Wall -Wp,-D_FORTIFY_SOURCE=2 -fexceptions -fstack-protector --param=ssp-buffer-size=4 -m64 -mtune=generic -D_GNU_SOURCE -fPIC -fwrapv -DNDEBUG -O2 -g -pipe -Wall -Wp,-D_FORTIFY_SOURCE=2 -fexceptions -fstack-protector --param=ssp-buffer-size=4 -m64 -mtune=generic -D_GNU_SOURCE -fPIC -fwrapv -fPIC -Dversion_info=(1,2,3,'final',0) -D__version__=1.2.3 -I/usr/include/mysql -I/usr/include/python2.6 -c _mysql.c -o build/temp.linux-x86_64-2.6/_mysql.o -g -pipe -Wp,-D_FORTIFY_SOURCE=2 -fexceptions -fstack-protector --param=ssp-buffer-size=4 -m64 -D_GNU_SOURCE -D_FILE_OFFSET_BITS=64 -D_LARGEFILE_SOURCE -fno-strict-aliasing -fwrapv -fPIC -DUNIV_LINUX -DUNIV_LINUX
_mysql.c:36:23: error: my_config.h: No such file or directory
_mysql.c:38:19: error: mysql.h: No such file or directory
_mysql.c:39:26: error: mysqld_error.h: No such file or directory
_mysql.c:40:20: error: errmsg.h: No such file or directory
[root@Knight-on-the-Cloud include]# yum -y install mysql-devel

[root@Knight-on-the-Cloud mysql]# pwd
/usr/include/mysql
[guohai@Knight-on-the-Cloud MySQL-python-1.2.3]$ python setup.py build
running build
running build_py
copying MySQLdb/release.py -> build/lib.linux-x86_64-2.6/MySQLdb
running build_ext
building '_mysql' extension
gcc -pthread -fno-strict-aliasing -O2 -g -pipe -Wall -Wp,-D_FORTIFY_SOURCE=2 -fexceptions -fstack-protector --param=ssp-buffer-size=4 -m64 -mtune=generic -D_GNU_SOURCE -fPIC -fwrapv -DNDEBUG -O2 -g -pipe -Wall -Wp,-D_FORTIFY_SOURCE=2 -fexceptions -fstack-protector --param=ssp-buffer-size=4 -m64 -mtune=generic -D_GNU_SOURCE -fPIC -fwrapv -fPIC -Dversion_info=(1,2,3,'final',0) -D__version__=1.2.3 -I/usr/include/mysql -I/usr/include/python2.6 -c _mysql.c -o build/temp.linux-x86_64-2.6/_mysql.o -g -pipe -Wp,-D_FORTIFY_SOURCE=2 -fexceptions -fstack-protector --param=ssp-buffer-size=4 -m64 -D_GNU_SOURCE -D_FILE_OFFSET_BITS=64 -D_LARGEFILE_SOURCE -fno-strict-aliasing -fwrapv -fPIC -DUNIV_LINUX -DUNIV_LINUX
In file included from /usr/include/mysql/my_config.h:14,
                 from _mysql.c:36:
/usr/include/mysql/my_config_x86_64.h:1082:1: warning: "HAVE_WCSCOLL" redefined
In file included from /usr/include/python2.6/pyconfig.h:6,
                 from /usr/include/python2.6/Python.h:8,
                 from pymemcompat.h:10,
                 from _mysql.c:29:
/usr/include/python2.6/pyconfig-64.h:808:1: warning: this is the location of the previous definition
gcc -pthread -shared build/temp.linux-x86_64-2.6/_mysql.o -L/usr/lib64/mysql -L/usr/lib64 -lmysqlclient_r -lz -lpthread -lcrypt -lnsl -lm -lpthread -lssl -lcrypto -lpython2.6 -o build/lib.linux-x86_64-2.6/_mysql.so

编译好了就安装

[root@Knight-on-the-Cloud MySQL-python-1.2.3]# python setup.py install
running install
running bdist_egg
running egg_info
writing MySQL_python.egg-info/PKG-INFO
writing top-level names to MySQL_python.egg-info/top_level.txt
writing dependency_links to MySQL_python.egg-info/dependency_links.txt
reading manifest file 'MySQL_python.egg-info/SOURCES.txt'
reading manifest template 'MANIFEST.in'
warning: no files found matching 'MANIFEST'
warning: no files found matching 'ChangeLog'
warning: no files found matching 'GPL'
writing manifest file 'MySQL_python.egg-info/SOURCES.txt'
installing library code to build/bdist.linux-x86_64/egg
running install_lib
running build_py
copying MySQLdb/release.py -> build/lib.linux-x86_64-2.6/MySQLdb
running build_ext
creating build/bdist.linux-x86_64
creating build/bdist.linux-x86_64/egg
copying build/lib.linux-x86_64-2.6/_mysql.so -> build/bdist.linux-x86_64/egg
copying build/lib.linux-x86_64-2.6/_mysql_exceptions.py -> build/bdist.linux-x86_64/egg
creating build/bdist.linux-x86_64/egg/MySQLdb
copying build/lib.linux-x86_64-2.6/MySQLdb/__init__.py -> build/bdist.linux-x86_64/egg/MySQLdb
copying build/lib.linux-x86_64-2.6/MySQLdb/cursors.py -> build/bdist.linux-x86_64/egg/MySQLdb
copying build/lib.linux-x86_64-2.6/MySQLdb/connections.py -> build/bdist.linux-x86_64/egg/MySQLdb
copying build/lib.linux-x86_64-2.6/MySQLdb/times.py -> build/bdist.linux-x86_64/egg/MySQLdb
copying build/lib.linux-x86_64-2.6/MySQLdb/release.py -> build/bdist.linux-x86_64/egg/MySQLdb
creating build/bdist.linux-x86_64/egg/MySQLdb/constants
copying build/lib.linux-x86_64-2.6/MySQLdb/constants/REFRESH.py -> build/bdist.linux-x86_64/egg/MySQLdb/constants
copying build/lib.linux-x86_64-2.6/MySQLdb/constants/CLIENT.py -> build/bdist.linux-x86_64/egg/MySQLdb/constants
copying build/lib.linux-x86_64-2.6/MySQLdb/constants/FIELD_TYPE.py -> build/bdist.linux-x86_64/egg/MySQLdb/constants
copying build/lib.linux-x86_64-2.6/MySQLdb/constants/FLAG.py -> build/bdist.linux-x86_64/egg/MySQLdb/constants
copying build/lib.linux-x86_64-2.6/MySQLdb/constants/__init__.py -> build/bdist.linux-x86_64/egg/MySQLdb/constants
copying build/lib.linux-x86_64-2.6/MySQLdb/constants/CR.py -> build/bdist.linux-x86_64/egg/MySQLdb/constants
copying build/lib.linux-x86_64-2.6/MySQLdb/constants/ER.py -> build/bdist.linux-x86_64/egg/MySQLdb/constants
copying build/lib.linux-x86_64-2.6/MySQLdb/converters.py -> build/bdist.linux-x86_64/egg/MySQLdb
byte-compiling build/bdist.linux-x86_64/egg/_mysql_exceptions.py to _mysql_exceptions.pyc
byte-compiling build/bdist.linux-x86_64/egg/MySQLdb/__init__.py to __init__.pyc
byte-compiling build/bdist.linux-x86_64/egg/MySQLdb/cursors.py to cursors.pyc
byte-compiling build/bdist.linux-x86_64/egg/MySQLdb/connections.py to connections.pyc
byte-compiling build/bdist.linux-x86_64/egg/MySQLdb/times.py to times.pyc
byte-compiling build/bdist.linux-x86_64/egg/MySQLdb/release.py to release.pyc
byte-compiling build/bdist.linux-x86_64/egg/MySQLdb/constants/REFRESH.py to REFRESH.pyc
byte-compiling build/bdist.linux-x86_64/egg/MySQLdb/constants/CLIENT.py to CLIENT.pyc
byte-compiling build/bdist.linux-x86_64/egg/MySQLdb/constants/FIELD_TYPE.py to FIELD_TYPE.pyc
byte-compiling build/bdist.linux-x86_64/egg/MySQLdb/constants/FLAG.py to FLAG.pyc
byte-compiling build/bdist.linux-x86_64/egg/MySQLdb/constants/__init__.py to __init__.pyc
byte-compiling build/bdist.linux-x86_64/egg/MySQLdb/constants/CR.py to CR.pyc
byte-compiling build/bdist.linux-x86_64/egg/MySQLdb/constants/ER.py to ER.pyc
byte-compiling build/bdist.linux-x86_64/egg/MySQLdb/converters.py to converters.pyc
creating stub loader for _mysql.so
byte-compiling build/bdist.linux-x86_64/egg/_mysql.py to _mysql.pyc
creating build/bdist.linux-x86_64/egg/EGG-INFO
copying MySQL_python.egg-info/PKG-INFO -> build/bdist.linux-x86_64/egg/EGG-INFO
copying MySQL_python.egg-info/SOURCES.txt -> build/bdist.linux-x86_64/egg/EGG-INFO
copying MySQL_python.egg-info/dependency_links.txt -> build/bdist.linux-x86_64/egg/EGG-INFO
copying MySQL_python.egg-info/top_level.txt -> build/bdist.linux-x86_64/egg/EGG-INFO
writing build/bdist.linux-x86_64/egg/EGG-INFO/native_libs.txt
zip_safe flag not set; analyzing archive contents...
creating dist
creating 'dist/MySQL_python-1.2.3-py2.6-linux-x86_64.egg' and adding 'build/bdist.linux-x86_64/egg' to it
removing 'build/bdist.linux-x86_64/egg' (and everything under it)
Processing MySQL_python-1.2.3-py2.6-linux-x86_64.egg
Copying MySQL_python-1.2.3-py2.6-linux-x86_64.egg to /usr/lib64/python2.6/site-packages
Adding MySQL-python 1.2.3 to easy-install.pth file

Installed /usr/lib64/python2.6/site-packages/MySQL_python-1.2.3-py2.6-linux-x86_64.egg
Processing dependencies for MySQL-python==1.2.3
Finished processing dependencies for MySQL-python==1.2.3

接着再来试下

[guohai@Knight-on-the-Cloud MySQL-python-1.2.3]$ python
Python 2.6.6 (r266:84292, Jul 10 2013, 22:48:45) 
[GCC 4.4.7 20120313 (Red Hat 4.4.7-3)] on linux2
Type "help", "copyright", "credits" or "license" for more information.
>>> import MySQLdb
/usr/lib64/python2.6/site-packages/MySQL_python-1.2.3-py2.6-linux-x86_64.egg/_mysql.py:3: UserWarning: Module _mysql was already imported from /usr/lib64/python2.6/site-packages/MySQL_python-1.2.3-py2.6-linux-x86_64.egg/_mysql.pyc, but /home/guohai/apps/installation/MySQL-python-1.2.3 is being added to sys.path

上面这些UserWarning是说MySQL模块已经引入了,但是你在的目录又被加入到sys.path,也就是重复引入。这个时候你只要跳出我们刚刚编译模块的目录就好了。
一切都正常之后我们来写个简单的程序试试看。

[guohai@Knight-on-the-Cloud npc]$ python
Python 2.6.6 (r266:84292, Jul 10 2013, 22:48:45) 
[GCC 4.4.7 20120313 (Red Hat 4.4.7-3)] on linux2
Type "help", "copyright", "credits" or "license" for more information.
>>> import MySQLdb

>>> help(MySQLdb) // 不懂的话就可以这样查询

>>> conn = MySQLdb.connect('localhost', 'wp_user', 'wp_passwd', 'wp_db')
>>> cur = conn.cursor()
>>> cur.execute('select user_login, user_registered from wp_users')
1L
>>> rst = cur.fetchall()
>>> print rst
(('admin', datetime.datetime(2011, 3, 19, 0, 8, 9)),)
>>> cur.close()
>>> conn.close()

与我们通过

[guohai@Knight-on-the-Cloud npc]# mysql -h localhost -u wp_user -p

查询出来的一样

mysql> select * from wp_users \G
*************************** 1. row ***************************
                 ID: 1
         user_login: admin
          user_pass: #CLASSIFIED#
      user_nicename: #CLASSIFIED#
         user_email: #CLASSIFIED#
           user_url: #CLASSIFIED#
    user_registered: 2011-03-19 00:08:09
user_activation_key: #CLASSIFIED#
        user_status: #CLASSIFIED#
       display_name: #CLASSIFIED#
1 row in set (0.00 sec)

也就是说我们简单的连接数据库成功了,到此基础环境算是搭建好了。

另外简单写了个备份程序(https://github.com/guohai/my-conf/blob/master/wp_backup_npc.py),待完善。。。

然后编写一个crontab就可以让它定时执行(不会crontab的请参见http://linux.vbird.org/linux_basic/redhat6.1/linux_11cron.php)

9 16 * * 0 cd /home/guohai/apps/npc/ && python wp_backup_npc.py &> /dev/null

就是在每周日的16点9分会运行一次后面的命令(跳转到npc文件夹,执行这个python命令,如果有一些信息输出的话就把信息重定向到/dev/null,如果有信息输出而不重定向这些信息的话,crontab就会认为这个命令是执行失败的,所以就会给你的邮箱发封提醒邮件,时间久了你的/var/spool/mail/账户下就会有很多邮件,所以这里我把一切输出信息都重定向到/dev/null了)。

当然你也可以阅读简单的介绍了解crontab脚本如何编写,如下:

# Edit this file to introduce tasks to be run by cron.
#
# Each task to run has to be defined through a single line
# indicating with different fields when the task will be run
# and what command to run for the task
#
# To define the time you can provide concrete values for
# minute (m), hour (h), day of month (dom), month (mon),
# and day of week (dow) or use ‘*’ in these fields (for ‘any’).#
# Notice that tasks will be started based on the cron’s system
# daemon’s notion of time and timezones.
#
# Output of the crontab jobs (including errors) is sent through
# email to the user the crontab file belongs to (unless redirected).
#
# For example, you can run a backup of all your user accounts
# at 5 a.m every week with:
# 0 5 * * 1 tar -zcf /var/backups/home.tgz /home/
#
# For more information see the manual pages of crontab(5) and cron(8)
#
# m h dom mon dow command

Eclipse C/C++ JNI NDK

在Java JNI或者Android NDK中,C或者CPP源码中引入header files的时候会出现Unresolved inclusion:
虽然不影响整个源码的编译,但是对于追求干净完美的人来说看了总会觉得有不爽,怎样解决这个呢?
原因是在Eclipse的编辑环境当中没有找到相应的header files,那么解决办法也很简单,就是把header files引入进来
操作步骤如下:
1、右击工程 > New > Folder
2、点击Advanced
3、选择Link to alternate location (Linked Folder),目录自己选择(比如JNI C的话是/usr/include和$JAVA_HOME/include,Android NDK的话是$ANDROID_NDK_HOME/platforms/android-X/arch-arm/usr/include)
4、Finish后Refresh工程(或者Close再Open Project)。

JNI当中Could not find symbol ‘xx’ in index
我们在JNI当中想查看某个函数或者类或者编译单元的源码的时候也想像Java里头一样可以方便的跟踪进去,但是总会出现如上错误。
这个时候只要为这些源码在Eclipse当中增加索引就可以。
操作步骤如下:
1、Window > Preferences > C/C++ > Indexer
2、把其中增加索引的都选上
3、Refresh工程(或者Close再Open Project)。