DialF: Drive a Real Phone From Your Terminal

A small tool that lets a script place real phone calls, talk, listen, and hang up —
on a real SIM, over a real cellular network.


Why we built this

AI voice agents are everywhere now — and they live and die by latency and audio quality. A
second of dead air, a stiff robotic voice, or choppy, fluctuating audio is the difference
between “sounds human” and “obviously a bot.” Yet before every release we were measuring those
things by hand: dial in,
read a script, listen for gaps, do it again on the next build. It didn’t scale, and “sounds
fine to me” is not a regression test.

What we actually needed was to automate a real phone call. Not a VoIP call. Not a simulator.
An actual call on an actual carrier — the kind that rings a normal phone, goes through the
normal network, and behaves exactly like a human dialing. So we could:

  • Test phone systems end to end — voice agents, IVRs, call centers, voicemail — the way a
    real caller experiences them.
  • Run scripted conversations — play a prompt, wait for the other side to finish talking,
    play the next one.
  • Record both sides cleanly, on one timeline, so we could measure latency (“how long
    after I speak does the other side respond?”) — as a number, on every build.

The catch: Android won’t let an app record or inject the audio of a cellular call. That
path is locked to the system. So a pure software approach is impossible.

DialF’s answer is simple and a little old-school: bridge the call audio through a real USB
sound card.
The phone does the dialing; a sound card plays into the phone’s mic and listens
on its earpiece. Your computer drives the whole thing — and we know you’ll wire your own AI
agents up to do the driving.


Why not a programmable 4G module?

It’s the first thing every engineer suggests, and it’s a fair instinct — a cellular module
takes a SIM, speaks AT commands, and dials from a script. Cheap, headless, no human in the loop.

But a module isn’t a phone. It carries its own compatibility quirks and behaves in ways real
handsets don’t — so it can quietly alter the very thing you’re trying to measure. You end up
testing the module’s behavior, not your users’ calls.

That’s the crux: a voice agent’s audio path is the product, and a module only tests a
synthetic version of it.
Your agent can sound flawless through a module and still ship
stutter and echo through a real earpiece — and the module never warns you, because it was never
on the path your callers actually hear. DialF drives a real phone for exactly that reason.


What it does

DialF turns a phone into something you can script:

  • 📞 Make, answer, reject, and hang up calls — on the phone’s own SIM.
  • 💬 Send and read SMS, read the call log and SIM list (dual-SIM aware).
  • 🎛️ Carrier controls — toggle voicemail, run raw MMI/USSD codes.
  • 🗣️ Scripted voice conversations — play audio prompts, and wait for the person to stop
    talking
    using voice-activity detection before moving on.
  • 🎙️ Record the call full-duplex — your audio, their audio, and a mix, all the same
    length and sample-aligned (great for latency analysis).

You drive all of it from one command-line tool, or from a small YAML script.


How it works

DialF has two parts that talk to each other, plus a deliberate split between control and
audio:

flowchart TB
  subgraph Host["Your computer"]
    CLI["dialf (CLI)"]
    D["dialfd (daemon)"]
    Card["USB sound card"]
  end
  subgraph Android["Android phone"]
    App["DialF Phone app"]
  end

  CLI -->|commands| D
  D <-->|"WiFi · WebSocket"| App
  D <-->|"audio in / out"| Card
  Card <-->|"headset cable"| App
  App -->|"dials / answers on its SIM"| Net(("Cellular network"))
  • Control plane (over WiFi): the dialf CLI sends commands to the dialfd daemon, which
    relays them to the DialF Phone app over a WebSocket. This is how dial / answer / SMS /
    hang up happen. No audio travels here.
  • Audio plane (physical): call audio flows through a USB sound card wired to the
    phone’s headset jack. The card plays into the phone’s microphone and records from its
    earpiece. The app just routes the call to the wired headset.

Why the split? Because Android blocks call-audio capture in software — so audio has to be
bridged physically, never over WiFi.

A scripted call, step by step

sequenceDiagram
  participant CLI as dialf CLI
  participant D as dialfd
  participant P as DialF Phone
  participant F as Far end

  CLI->>D: run call-script.yaml
  D->>P: dial +1...
  P->>F: ringing…
  F-->>P: answers
  P-->>D: call active
  Note over D: call.wait_answered satisfied
  D->>P: play prompt (out the sound card → phone mic)
  P->>F: far end hears the prompt
  F-->>P: spoken reply (phone earpiece → sound card)
  P-->>D: reply audio captured
  Note over D: VAD waits for the reply to finish
  D->>P: play next prompt … then hang up

How to use it

1. Install the CLI (macOS or Linux)

npm install -g @agora-build/dialf
# or: curl -fsSL https://dl.agora.build/dialf/install.sh | bash

Then start the background daemon:

dialf service install --user      # runs dialfd at login

On a Mac or laptop, keep --user — it runs as you, when you log in (needed so it can reach
the sound card and mic). Use plain dialf service install (with sudo) only on a headless
Linux server that should start at boot.

2. Install the phone app

Sideload the APK on the Android phone (Android 9+):

Open it, grant phone/SMS permissions, and set it as the default dialer (that’s what lets
it place and track calls).

3. Pair them

In the app, enter the same shared key as your dialfd config and tap Start service.
The phone finds the daemon automatically on your WiFi (mDNS). Confirm it’s connected:

dialf devices        # your phone should appear

4. Drive it

dialf call dial   <phone> +15551234        # place a call
dialf call hangup <phone>                  # hang up
dialf sms  send   <phone> +15551234 "hi"   # send a text
dialf call list   <phone> --human          # read the call log
dialf --version                            # CLI + daemon versions

5. Script a conversation

Jobs are plain YAML — a list of steps run in order:

- type: call.dial
  number: "+15551234"
- type: call.wait_answered      # wait for a real answer, not a fixed timer
  timeout_ms: 30000
- type: audio.play              # inject a prompt into the call
  file: samples/prompt-en-1.wav
- type: audio.wait_for_speech   # listen until the other side stops talking
  end_timeout_ms: 45000
  silence_duration_ms: 3000
- type: sms.send
  to: "+15551234"
  body: "thanks!"
- type: call.hangup
dialf run call-script.yaml

audio.wait_for_speech is the clever bit: it runs voice-activity detection on the incoming
audio, so the script moves on when the person actually finishes speaking — not after a
guess.


Recording and latency

If you turn on recording, every call is written as three aligned WAV files:

  • …-tx.wav — what you sent (your prompts)
  • …-rx.wav — what the far end said
  • …-mix.wav — both together

They’re captured on a single clock, so they line up sample-for-sample. That makes latency
measurable: cross-correlate tx against rx and the offset is your round-trip delay.

flowchart LR
  TX["tx.wav · your prompt"] --> MIX["mix.wav · both, summed"]
  RX["rx.wav · far-end reply"] --> MIX
  TX -.->|"cross-correlate"| RX
  RX --> L["latency = the lag between them"]

Wrapping up

DialF is a thin, scriptable bridge between your terminal and a real phone. The control side is
clean software over WiFi; the audio side is honest about hardware — a sound card doing what
software isn’t allowed to. Together they let a few lines of YAML place a call, hold a
conversation, and hand you a clean recording.

It runs on macOS and Linux, the CLI installs from npm, and the phone app is a sideloadable
APK. If you’ve ever wanted to put a real phone call inside a for loop — that’s the idea.


License

DialF is released under the MIT License.

Disclaimer: This tool is strictly for engineering use only and must not be used for any
illegal purposes. The user bears all legal consequences arising from its use.

Building WebRTC for Android

ENV
Ubuntu

入门以及下载源码
https://webrtc.org/native-code/development/
https://webrtc.org/native-code/android/

gclient config --name=src https://chromium.googlesource.com/external/webrtc.git
echo "target_os = ['android']" >> .gclient
gclient sync --force
gclient runhooks --force

查看支持的参数列表

gn args --list out/Debug

设置参数

gn gen out/Debug --args='target_os="android" rtc_include_tests=false enable_nocompile_tests=true libyuv_include_tests=false'

开始编译

ninja -C out/Debug 或者 ninja -C out/Release

内存不够的时候就用 -j1 或者 -j2

需要使用项目自带的一些工具的时候需要执行

source ./build/android/envsetup.sh

可能出现的问题

guohai@ubuntu:/home/guohai/WebRTC/src$ ninja -C out/Debug
ninja: Entering directory `out/Debug'
[4/3003] ACTION //base:android_runtime_jni_headers__jni_Runtime(//build/toolchain/android:android_clang_arm)
FAILED: gen/base/android_runtime_jni_headers/base/jni/Runtime_jni.h 
python ../../base/android/jni_generator/jni_generator.py --jar_file ../../third_party/android_tools/sdk/platforms/android-28/android.jar --input_file java/lang/Runtime.class --ptr_type=long --output_dir gen/base/android_runtime_jni_headers/base/jni --includes ../../../../../../../base/android/jni_generator/jni_generator_helper.h
Traceback (most recent call last):
  File "../../base/android/jni_generator/jni_generator.py", line 1405, in <module>
    sys.exit(main(sys.argv))
  File "../../base/android/jni_generator/jni_generator.py", line 1401, in main
    GenerateJNIHeader(input_file, output_file, options)
  File "../../base/android/jni_generator/jni_generator.py", line 1308, in GenerateJNIHeader
    jni_from_javap = JNIFromJavaP.CreateFromClass(input_file, options)
  File "../../base/android/jni_generator/jni_generator.py", line 773, in CreateFromClass
    stderr=subprocess.PIPE)
  File "/usr/lib/python2.7/subprocess.py", line 710, in __init__
    errread, errwrite)
  File "/usr/lib/python2.7/subprocess.py", line 1327, in _execute_child
    raise child_exception
OSError: [Errno 2] No such file or directory
Java 环境变量没有设置好,这里需要 javap 命令
/home/guohai/WebRTC/src/third_party/android_tools/sdk//build-tools/22.0.0/aapt: error while loading shared libraries: libz.so.1: cannot open shared object file: No such file or directory
sudo apt-get install lib32z1

Hello World Android Things

物联网 IoT(Internet of things) 一个听起来高大上,但是实际上是历史悠久东西,但是随着社会/科技的发展(网络,协议,设备等等共同的发展),近些年被正式命名了。

以前开发这类的产品都需要复杂的流程,比如厂商基于某款特定的硬件,移植某个嵌入式的操作系统,然后在上面开发定制化的程序,可能需要懂些底层的东西,比如驱动程序等等,而且运行资源都相对来说很有限。

但是 Google 某一天宣布了一个叫做 Android Things 的东西,好像很多事情都变的简单些了。

这里就不介绍了,直接入门,记录怎么让第一个程序如何跑起来。

1) 硬件设备 RASPBERRY PI 3 MODEL B

我个人比较喜欢这款性价比高的硬件设备,自己买过一些开发板,这个完全不心疼 ^_^

不管是二手的,还是新的,只要型号对的,买个就好了(以前我也很纠结是买原产国还是买国产的,后来就选择买便宜的)

2) 操作系统 Android Things

https://developer.android.com/things/hardware/raspberrypi.html

下载镜像(https://developer.android.com/things/preview/download.html),烧录到 Micro SD Card 上,具体办法网上搜索(我这里旧物利用,翻出来原来 Motorola Milestone 上的一张卡)。制作完毕之后就可以插电开机(USB 供电,HDMI 视频输出,HDMI 也可以提供供电)。

开机之后的画面
at-iot-home

RASPBERRY PI 3 MODEL B 支持无线网络和有线网络,开发调试 adb 支持无线和有线

我这里使用的是 macOS

查看接入的 SD Card 挂载位置

diskutil list
sudo dd bs=1m if=iot_rpi3.img of=/dev/disk3

具体文件名和挂载位置根据实际情况修改

3) 开发程序

https://developer.android.com/things/sdk/samples.html

推出 Android Things 的意图就是物联网会爆发起来(虽然目前还不确切知道什么时候),所以开发程序必须要简单快速。最简单的看下本 Sample 就好了。

本程序和普通的 Android 程序配置上差别不大,就是新建一个标准的 Phone/Tablet 项目就好,主要在 app/build.gradle 和 AndroidManifest.xml 当中有点差别

Jshell 启动错误 build 9-ea+121

Exception in thread "main" java.lang.InternalError: Launching execution engine threw: Failed remote launch: com.sun.jdi.CommandLineLaunch (defaults: home=/Library/Java/JavaVirtualMachines/jdk-9.jdk/Contents/Home, options=, main=, suspend=true, quote=", vmexec=java) -- {home=home=/Library/Java/JavaVirtualMachines/jdk-9.jdk/Contents/Home, options=options=, main=main=jdk.internal.jshell.remote.RemoteAgent 57696, suspend=suspend=true, quote=quote=", vmexec=vmexec=java}
at jdk.jshell.JShell.executionControl(jdk.jshell@9-ea/JShell.java:714)
at jdk.jshell.Unit.classesToLoad(jdk.jshell@9-ea/Unit.java:275)
at jdk.jshell.Eval.lambda$compileAndLoad$15(jdk.jshell@9-ea/Eval.java:580)
at java.util.stream.ReferencePipeline$7$1.accept(java.base@9-ea/ReferencePipeline.java:269)
at java.util.ArrayList$ArrayListSpliterator.forEachRemaining(java.base@9-ea/ArrayList.java:1477)
at java.util.stream.AbstractPipeline.copyInto(java.base@9-ea/AbstractPipeline.java:484)
at java.util.stream.AbstractPipeline.wrapAndCopyInto(java.base@9-ea/AbstractPipeline.java:474)
at java.util.stream.ReduceOps$ReduceOp.evaluateSequential(java.base@9-ea/ReduceOps.java:913)
at java.util.stream.AbstractPipeline.evaluate(java.base@9-ea/AbstractPipeline.java:234)
at java.util.stream.ReferencePipeline.collect(java.base@9-ea/ReferencePipeline.java:511)
at jdk.jshell.Eval.compileAndLoad(jdk.jshell@9-ea/Eval.java:581)
at jdk.jshell.Eval.declare(jdk.jshell@9-ea/Eval.java:441)
1 127.0.0.1 Hais-MacBook-Pro
at jdk.jshell.Eval.processMethod(jdk.jshell@9-ea/Eval.java:372)
at jdk.jshell.Eval.eval(jdk.jshell@9-ea/Eval.java:127)
at jdk.jshell.JShell.eval(jdk.jshell@9-ea/JShell.java:393)
at jdk.internal.jshell.tool.JShellTool.processCompleteSource(jdk.jshell@9-ea/JShellTool.java:2114)
at jdk.internal.jshell.tool.JShellTool.processSource(jdk.jshell@9-ea/JShellTool.java:2102)
at jdk.internal.jshell.tool.JShellTool.processSourceCatchingReset(jdk.jshell@9-ea/JShellTool.java:789)
at jdk.internal.jshell.tool.JShellTool.run(jdk.jshell@9-ea/JShellTool.java:769)
at jdk.internal.jshell.tool.JShellTool.startUpRun(jdk.jshell@9-ea/JShellTool.java:706)
at jdk.internal.jshell.tool.JShellTool.resetState(jdk.jshell@9-ea/JShellTool.java:663)
at jdk.internal.jshell.tool.JShellTool.start(jdk.jshell@9-ea/JShellTool.java:483)
at jdk.internal.jshell.tool.JShellTool.start(jdk.jshell@9-ea/JShellTool.java:462)
at jdk.internal.jshell.tool.JShellTool.main(jdk.jshell@9-ea/JShellTool.java:452)
Caused by: java.lang.InternalError: Failed remote launch: com.sun.jdi.CommandLineLaunch (defaults: home=/Library/Java/JavaVirtualMachines/jdk-9.jdk/Contents/Home, options=, main=, suspend=true, quote=", vmexec=java) -- {home=home=/Library/Java/JavaVirtualMachines/jdk-9.jdk/Contents/Home, options=options=, main=main=jdk.internal.jshell.remote.RemoteAgent 57696, suspend=suspend=true, quote=quote=", vmexec=vmexec=java}
at jdk.internal.jshell.jdi.JDIConnection.reportLaunchFail(jdk.jshell@9-ea/JDIConnection.java:353)
at jdk.internal.jshell.jdi.JDIConnection.launchTarget(jdk.jshell@9-ea/JDIConnection.java:319)
at jdk.internal.jshell.jdi.JDIConnection.open(jdk.jshell@9-ea/JDIConnection.java:120)
at jdk.internal.jshell.jdi.JDIEnv.init(jdk.jshell@9-ea/JDIEnv.java:49)
at jdk.internal.jshell.jdi.JDIExecutionControl.jdiGo(jdk.jshell@9-ea/JDIExecutionControl.java:425)
at jdk.internal.jshell.jdi.JDIExecutionControl.start(jdk.jshell@9-ea/JDIExecutionControl.java:95)
at jdk.jshell.JShell.executionControl(jdk.jshell@9-ea/JShell.java:712)
... 23 more
Caused by: com.sun.jdi.connect.VMStartException: VM initialization failed for: /Library/Java/JavaVirtualMachines/jdk-9.jdk/Contents/Home/bin/java -Xdebug -Xrunjdwp:transport=dt_socket,address=Hais-MacBook-Pro:57697,suspend=y jdk.internal.jshell.remote.RemoteAgent 57696
at com.sun.tools.jdi.AbstractLauncher$Helper.launchAndAccept(jdk.jdi@9-ea/AbstractLauncher.java:193)
at com.sun.tools.jdi.AbstractLauncher.launch(jdk.jdi@9-ea/AbstractLauncher.java:132)
at com.sun.tools.jdi.SunCommandLineLauncher.launch(jdk.jdi@9-ea/SunCommandLineLauncher.java:225)
at jdk.internal.jshell.jdi.JDIConnection.launchTarget(jdk.jshell@9-ea/JDIConnection.java:312)
... 28 more

https://bugs.openjdk.java.net/browse/JDK-8131029

这个问题在新版的已经被修复了,但是如果碰到了,可以修改 /etc/hosts 来绕过(增加一个本地计算机名字的 loop ip)

本地计算机名字可以用

uname -n

来查看

参考这个文章找到的 workaround

小结二零一五

虽然都是流水账(这年终总结也做的太晚了T_T),但是还是要记录一下,还是分 2 个部分。

工作上有喜也有忧,总之创业不是个容易的事情,“大众创业万众创新”看起来很霸气,但是你看看今年死掉多少创业公司就知道了,还好我们还算幸运,公司人力和业务在这一年都有了比较大的进展,但是距离目标还是很遥远。自己负责的这一块整体进展还不令人满意(自己的角色也从一个不停写代码的人转变为写代码 + 维护整体项目),但是今年应该会有些努力尝试的方向和自由度,另外也需要更集中精力,因为不免杂事很多,需要花比较多的时间来处理,效率下降。不过总之我们都还是走在正确的路上。

生活上今年膝盖受伤(膝关节脂肪垫磨损)是最大的障碍了,医生劝告自己修养,所以很多运动都无法进行,非常感谢这期间同事一段时间内几乎每天帮我带外卖,希望 2016 年能恢复到可以自由的玩所有各种运动(千万是不要自己作死,哈哈哈)。能和喜欢的人在一起也很开心,虽然经历了千辛万苦,期待我们的未来美好,当然先努力实现我们的一些小愿望吧,一步一步朝前走。

还有一件重要的事情是时间上能安排合理,需要看书,写代码,写博客,这地方基本已经处于半荒废状态了。
忙,不要把自己忙的找不到方向了

P.S. 目前我们正在做的是互联网上提供有保障的实时音视频传输方案,Powering Real-Time Communications,agora.io,广告就不多做啦

独立编译 Skia for Android

最近想了解下 Skia 相关的东西,想利用其中的一些 API 来做做优化,所以打算独立编译一个版本试试看。

https://skia.org/user/quick/android

使用的代码版本

commit 81bdbf8bed8b739c2b65ac576e89d0258276e6dc
Author: caryclark <[email protected]>
Date:   Wed Oct 21 04:16:19 2015 -0700

编译环境

Ubuntu 14.04.2

直接按照官方说明就可以编译出来,我这里是不想去下载一遍 NDK,所以进行了点改动。

http://dl.google.com/android/ndk/android-ndk-r10e-linux-x86_64.bin

如果机器上已经安装过对应版本的 NDK,可以修改以下文件直接生成 TOOLCHAIN(这个步骤不是必须的)

/mnt/extra/skia/platform_tools/android/bin/utils/setup_toolchain.sh
 function default_toolchain() {
-  TOOLCHAINS=${SCRIPT_DIR}/../toolchains
+  TOOLCHAINS=/home/ubuntu/dev
 
   ANDROID_ARCH=${ANDROID_ARCH-arm}
   LLVM=3.6
@@ -50,19 +50,13 @@ function default_toolchain() {
   exportVar ANDROID_TOOLCHAIN "${TOOLCHAINS}/${TOOLCHAIN}/bin"
 
   if [ ! -d "$ANDROID_TOOLCHAIN" ]; then
-    mkdir -p $TOOLCHAINS
     pushd $TOOLCHAINS
-    curl -o $NDK.bin https://dl.google.com/android/ndk/android-ndk-$NDK-$HOST-x86_64.bin
-    chmod +x $NDK.bin
-    ./$NDK.bin -y
     ./android-ndk-$NDK/build/tools/make-standalone-toolchain.sh \
         --arch=$ANDROID_ARCH    \
         --llvm-version=$LLVM    \
         --platform=android-$API \
         --install_dir=$TOOLCHAIN
     cp android-ndk-$NDK/prebuilt/android-$ANDROID_ARCH/gdbserver/gdbserver $TOOLCHAIN
-    rm $NDK.bin
-    rm -rf android-ndk-$NDK
     popd
   fi

生成过一次 TOOLCHAIN 之后也可以把

export ANDROID_TOOLCHAIN=/home/ubuntu/dev/arm-r10e-14/bin
export PATH=$ANDROID_TOOLCHAIN:$PATH

手动加在到配置文件里面去(这个步骤不是必须的)

./platform_tools/android/bin/android_ninja -d nexus_5

然后就是等待编译,如果中途编译 APK 的时候却少一些特定版本的 Build Tool 的时候修改下 App 当中使用版本就好了,或者也可以去更新代码当中对应的版本
App 代码位于

/mnt/extra/skia/platform_tools/android/apps/

编译完成之后就可以在

/mnt/extra/skia/out/config/android-nexus_5/Debug

下看到 so 了

android.util.Pair 引起的崩溃

博客好久没有更新过了。
一直都觉得自己没啥时间 囧囧

创业开始一直都在负责 App 相关的工作。
早上例行看了下昨日统计,崩溃率暴涨,但是就维持在 4 个用户,一看 Android 版本,都是 4.0.4,
心想肯定尼玛有碰到了不该用的 API。

FATAL EXCEPTION: h-262 262
PID: 2610
java.lang.NullPointerException
at android.util.Pair.hashCode(Pair.java:63)
at java.lang.Object.toString(Object.java:332)
at java.lang.StringBuilder.append(StringBuilder.java:202)
at java.util.AbstractMap.toString(AbstractMap.java:448)
at java.lang.StringBuilder.append(StringBuilder.java:202)
......
at android.os.Handler.dispatchMessage(Handler.java:99)
at android.os.Looper.loop(Looper.java:137)
at cc.beckon.service.a.h.run(l:159)

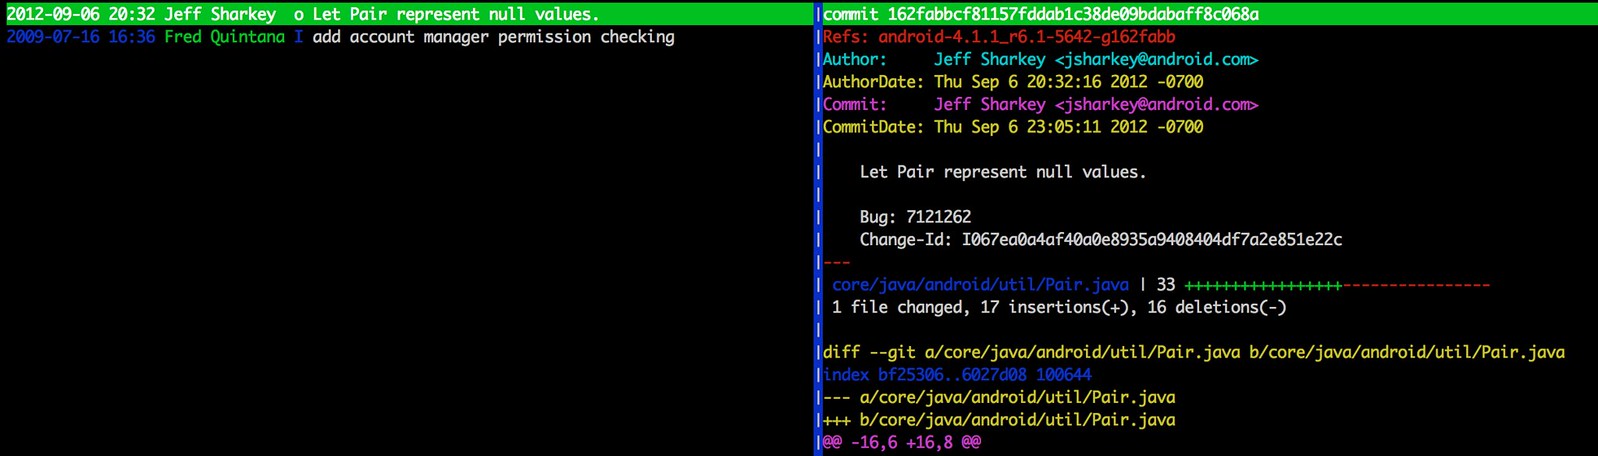
看了下最新的 android.util.Pair 代码,似乎没有什么问题,然后追溯这个文件的修改历史
Screen Shot 2015-10-06 at 12.34.01 PM
对于为 Null 的值在低版本的 Pair 上确实无法处理,回过头来看,在这条案例上没有测试到就直接上了,该打。

小结二零一四

看了下 2014 年的目标 小结二零一三,很多都没有完成。。。所以 2015 年的目标就是把 2014 年的完成[我知道你们会不相信 @_@]。

2014
中秋回家看了一次家人,然后还算经常地给他们通电话。。。

在一家 Vans 店看到别人玩滑板的视屏觉得很酷,然后自己买了块板开始玩,不过时间有限,努力训练也没有别人多,所以技术自然也不是特别好,处于一个需要认真训练才能跨过的坎,反正慢慢玩呗,有空晚上去滑滑,看别人滑滑,跟着大部队刷刷街

上半年还比较勤的去玩篮球,下半年就只能呵呵了

有一个事情还是算好的,现在大部分时间可以坐直了工作(以前都是弯着腰),形成了习惯,不过不知道对脊柱有没有什么不良影响

其它大部分时间应该都是工作,吃饭,睡觉,一直处于忙碌状态

OS X 上交叉编译在 Android 上运行的 libevent

下载官方源码 这里使用的是 libevent-2.0.21

首先看了下这几篇文章

http://blog.csdn.net/sozell/article/details/8898646
http://blog.csdn.net/cutesource/article/details/8970641
http://blog.chinaunix.net/uid-20514606-id-485808.html
注意,以下 $ANDROID_NDK 都是本机上 NDK 的路径

export ANDROID_ROOT=$ANDROID_NDK

export PATH=$PATH:$ANDROID_ROOT/toolchains/arm-linux-androideabi-4.9/prebuilt/darwin-x86_64/bin

 ./configure \
 --host=arm-linux-androideabi \
 CC=arm-linux-androideabi-gcc \
 LD=arm-linux-androideabi-ld \
 CPPFLAGS="-I$ANDROID_ROOT/platforms/android-14/arch-arm/usr/include/" \
 CFLAGS="-nostdlib" \
 LDFLAGS="-Wl,-rpath-link=$ANDROID_ROOT/platforms/android-14/arch-arm/usr/lib/ -L$ANDROID_ROOT/platforms/android-14/arch-arm/usr/lib/" \
 LIBS="-lc -lgcc -L$ANDROID_ROOT/toolchains/arm-linux-androideabi-4.9/prebuilt/darwin-x86_64/lib/gcc/arm-linux-androideabi/4.9"

ln -s $ANDROID_ROOT/platforms/android-14/arch-arm/usr/lib/crtbegin_so.o
ln -s $ANDROID_ROOT/platforms/android-14/arch-arm/usr/lib/crtend_so.o

make

还有另外一种方法,看起来比较正规点

http://stackoverflow.com/questions/11929773/compiling-the-latest-openssl-for-android

以下是编译armv7-a的方法(其它arch需要稍微调整下)

注意,以下 $ANDROID_NDK 都是本机上 NDK 的路径

export NDK=$ANDROID_NDK
$NDK/build/tools/make-standalone-toolchain.sh --platform=android-14 --toolchain=arm-linux-androideabi-4.9 --install-dir=`pwd`/android-toolchain-arm
export TOOLCHAIN_PATH=`pwd`/android-toolchain-arm/bin
export TOOL=arm-linux-androideabi
export NDK_TOOLCHAIN_BASENAME=${TOOLCHAIN_PATH}/${TOOL}
export CC=$NDK_TOOLCHAIN_BASENAME-gcc
export CXX=$NDK_TOOLCHAIN_BASENAME-g++
export LINK=${CXX}
export LD=$NDK_TOOLCHAIN_BASENAME-ld
export AR=$NDK_TOOLCHAIN_BASENAME-ar
export RANLIB=$NDK_TOOLCHAIN_BASENAME-ranlib
export STRIP=$NDK_TOOLCHAIN_BASENAME-strip
export ARCH_FLAGS="-march=armv7-a -mfloat-abi=softfp -mfpu=vfpv3-d16"
export ARCH_LINK="-march=armv7-a -Wl,--fix-cortex-a8"
export CPPFLAGS=" ${ARCH_FLAGS} -fpic -ffunction-sections -funwind-tables -fstack-protector -fno-strict-aliasing -finline-limit=64 "
export CXXFLAGS=" ${ARCH_FLAGS} -fpic -ffunction-sections -funwind-tables -fstack-protector -fno-strict-aliasing -finline-limit=64 -frtti -fexceptions "
export CFLAGS=" ${ARCH_FLAGS} -fpic -ffunction-sections -funwind-tables -fstack-protector -fno-strict-aliasing -finline-limit=64 "
export LDFLAGS=" ${ARCH_LINK} "

./configure --host=arm-linux-androideabi

就会在 .libs 下生成 so/a 档案

例子程序程序调用过程当中遇到的问题,具体完整代码参见 https://github.com/guohai/and-libevent

guohai@Hais-MacBook-Pro:~/Dev/work/idea/and-libevent/app/src/main/jni$ ndk-build V=1 -B
rm -f /Users/guohai/Dev/work/idea/and-libevent/app/src/main/libs/arm64-v8a/lib*.so /Users/guohai/Dev/work/idea/and-libevent/app/src/main/libs/armeabi/lib*.so /Users/guohai/Dev/work/idea/and-libevent/app/src/main/libs/armeabi-v7a/lib*.so /Users/guohai/Dev/work/idea/and-libevent/app/src/main/libs/armeabi-v7a-hard/lib*.so /Users/guohai/Dev/work/idea/and-libevent/app/src/main/libs/mips/lib*.so /Users/guohai/Dev/work/idea/and-libevent/app/src/main/libs/mips64/lib*.so /Users/guohai/Dev/work/idea/and-libevent/app/src/main/libs/x86/lib*.so /Users/guohai/Dev/work/idea/and-libevent/app/src/main/libs/x86_64/lib*.so
rm -f /Users/guohai/Dev/work/idea/and-libevent/app/src/main/libs/arm64-v8a/gdbserver /Users/guohai/Dev/work/idea/and-libevent/app/src/main/libs/armeabi/gdbserver /Users/guohai/Dev/work/idea/and-libevent/app/src/main/libs/armeabi-v7a/gdbserver /Users/guohai/Dev/work/idea/and-libevent/app/src/main/libs/armeabi-v7a-hard/gdbserver /Users/guohai/Dev/work/idea/and-libevent/app/src/main/libs/mips/gdbserver /Users/guohai/Dev/work/idea/and-libevent/app/src/main/libs/mips64/gdbserver /Users/guohai/Dev/work/idea/and-libevent/app/src/main/libs/x86/gdbserver /Users/guohai/Dev/work/idea/and-libevent/app/src/main/libs/x86_64/gdbserver
rm -f /Users/guohai/Dev/work/idea/and-libevent/app/src/main/libs/arm64-v8a/gdb.setup /Users/guohai/Dev/work/idea/and-libevent/app/src/main/libs/armeabi/gdb.setup /Users/guohai/Dev/work/idea/and-libevent/app/src/main/libs/armeabi-v7a/gdb.setup /Users/guohai/Dev/work/idea/and-libevent/app/src/main/libs/armeabi-v7a-hard/gdb.setup /Users/guohai/Dev/work/idea/and-libevent/app/src/main/libs/mips/gdb.setup /Users/guohai/Dev/work/idea/and-libevent/app/src/main/libs/mips64/gdb.setup /Users/guohai/Dev/work/idea/and-libevent/app/src/main/libs/x86/gdb.setup /Users/guohai/Dev/work/idea/and-libevent/app/src/main/libs/x86_64/gdb.setup
[armeabi-v7a] Compile thumb  : demo_libevent <= demo_libevent.c
/Users/guohai/Dev/android-ndk-r10c/toolchains/arm-linux-androideabi-4.6/prebuilt/darwin-x86_64/bin/arm-linux-androideabi-gcc -MMD -MP -MF /Users/guohai/Dev/work/idea/and-libevent/app/src/main/obj/local/armeabi-v7a/objs/demo_libevent/demo_libevent.o.d -fpic -ffunction-sections -funwind-tables -fstack-protector -no-canonical-prefixes -march=armv7-a -mfpu=vfpv3-d16 -mfloat-abi=softfp -mthumb -Os -g -DNDEBUG -fomit-frame-pointer -fno-strict-aliasing -finline-limit=64 -I/Users/guohai/Dev/work/idea/and-libevent/app/src/main/jni -DANDROID  -Wa,--noexecstack -Wformat -Werror=format-security    -I/Users/guohai/Dev/android-ndk-r10c/platforms/android-3/arch-arm/usr/include -c  /Users/guohai/Dev/work/idea/and-libevent/app/src/main/jni/demo_libevent.c -o /Users/guohai/Dev/work/idea/and-libevent/app/src/main/obj/local/armeabi-v7a/objs/demo_libevent/demo_libevent.o
&#91;armeabi-v7a&#93; Executable     : demo_libevent
/Users/guohai/Dev/android-ndk-r10c/toolchains/arm-linux-androideabi-4.6/prebuilt/darwin-x86_64/bin/arm-linux-androideabi-g++ -Wl,--gc-sections -Wl,-z,nocopyreloc --sysroot=/Users/guohai/Dev/android-ndk-r10c/platforms/android-3/arch-arm -Wl,-rpath-link=/Users/guohai/Dev/android-ndk-r10c/platforms/android-3/arch-arm/usr/lib -Wl,-rpath-link=/Users/guohai/Dev/work/idea/and-libevent/app/src/main/obj/local/armeabi-v7a /Users/guohai/Dev/work/idea/and-libevent/app/src/main/obj/local/armeabi-v7a/objs/demo_libevent/demo_libevent.o /Users/guohai/Dev/work/idea/and-libevent/app/src/main/jni/libevent.a /Users/guohai/Dev/work/idea/and-libevent/app/src/main/jni/libevent_core.a /Users/guohai/Dev/work/idea/and-libevent/app/src/main/jni/libevent_extra.a /Users/guohai/Dev/work/idea/and-libevent/app/src/main/jni/libevent_pthreads.a -lgcc -no-canonical-prefixes -march=armv7-a -Wl,--fix-cortex-a8  -Wl,--no-undefined -Wl,-z,noexecstack -Wl,-z,relro -Wl,-z,now  -L/Users/guohai/Dev/android-ndk-r10c/platforms/android-3/arch-arm/usr/lib -llog -lc -lm -o /Users/guohai/Dev/work/idea/and-libevent/app/src/main/obj/local/armeabi-v7a/demo_libevent
/Users/guohai/Dev/android-ndk-r10c/toolchains/arm-linux-androideabi-4.6/prebuilt/darwin-x86_64/bin/../lib/gcc/arm-linux-androideabi/4.6/../../../../arm-linux-androideabi/bin/ld: /Users/guohai/Dev/work/idea/and-libevent/app/src/main/jni/libevent.a(event.o): in function evthread_make_base_notifiable:event.c(.text.evthread_make_base_notifiable+0x5c): error: undefined reference to 'eventfd'
collect2: ld returned 1 exit status
make: *** &#91;/Users/guohai/Dev/work/idea/and-libevent/app/src/main/obj/local/armeabi-v7a/demo_libevent&#93; Error 1
&#91;/bash&#93;

<strong>eventfd</strong> 是 2.6.22 加入到内核当中的系统调用,然后默认写的 -L/Users/guohai/Dev/android-ndk-r10c/platforms/android-3/arch-arm/usr/lib 内核比较低,于是修改

[bash]
APP_PLATFORM := android-14

编译通过

在模拟器上启动程序,配置端口转发,测试

guohai@Hais-MacBook-Pro:~$ adb forward tcp:9995 tcp:9995

guohai@Hais-MacBook-Pro:~$ telnet localhost 9995
Trying ::1...
telnet: connect to address ::1: Connection refused
Trying 127.0.0.1...
Connected to localhost.
Escape character is '^]'.
Hello, World!
Connection closed by foreign host.

服务器端的反馈

root@generic:/data/data # ./demo_libevent                                        
flushed answer
^CCaught an interrupt signal; exiting cleanly in two seconds.
done
root@generic:/data/data # exit