之前有写过一篇http://guoh.org/lifelog/2012/06/building-and-flashing-rom-for-pandaboard-es/
那篇只是记录主要的问题,没有把详细过程记录下来,因为我当初也是参考别人的出来了,所以就觉得没有必要把详细的东西记录下来。
很多同学看了那边文章还是弄不出来,于是我答应周末有空的时候再完整做一个这个过程供大家参考。
因为这个板子是裸板,没有什么窗口可以显示当前板子的状态,所以可能这个难住了一些同学。买一个板子配套的扩展板又太贵了,不划算。
所以我建议如果大家实在搞不出来,也不知道原因的话,可以买根Linux下可用的串口线(如果你用Mac OS的话自己酌情处理),结合PuTTY用着包你瞬间明白烧录ROM其实也不难。
下面开始正文:
一,Build ROM
编译需要X64的操作系统,官方也是这么说的
X32位机器出现如下错误
/lib64/ld-linux-x86-64.so.2: No such file or directory
关于所用源码
官方也说了,pandaboard只支持master的code,所以源码需要是master的
我这里是目前最新的代码,2012-09-08这天的代码
repo init -u https://android.googlesource.com/platform/manifest
repo sync
repo forall -c 'git checkout -b master aosp/master'
安装一个patch(源码不同这个patch就不同哦)
https://developers.google.com/android/nexus/drivers#panda
PandaBoard binaries for Android 4.0.4 (IMM76I to IMM76L)
在X64上开始编译
guohai@KNIGHT:~/dev/src/android/git/panda$ source build/envsetup.sh
including device/asus/grouper/vendorsetup.sh
including device/generic/armv7-a-neon/vendorsetup.sh
including device/generic/armv7-a/vendorsetup.sh
including device/moto/wingray/vendorsetup.sh
including device/samsung/crespo4g/vendorsetup.sh
including device/samsung/crespo/vendorsetup.sh
including device/samsung/maguro/vendorsetup.sh
including device/samsung/toro/vendorsetup.sh
including device/sony/lt26/vendorsetup.sh
including device/ti/panda/vendorsetup.sh
including sdk/bash_completion/adb.bash
guohai@KNIGHT:~/dev/src/android/git/panda$ lunch
You’re building on Linux
Lunch menu… pick a combo:
1. full-eng
2. full_x86-eng
3. vbox_x86-eng
4. full_mips-eng
5. full_grouper-userdebug
6. mini_armv7a_neon-userdebug
7. mini_armv7a-userdebug
8. full_wingray-userdebug
9. full_crespo4g-userdebug
10. full_crespo-userdebug
11. full_maguro-userdebug
12. full_toro-userdebug
13. full_lt26-userdebug
14. full_panda-userdebug
在此我选择
full_panda-userdebug
Which would you like? [full-eng] full_panda-userdebug
============================================
PLATFORM_VERSION_CODENAME=AOSP
PLATFORM_VERSION=4.0.9.99.999.9999.99999
TARGET_PRODUCT=full_panda
TARGET_BUILD_VARIANT=userdebug
TARGET_BUILD_TYPE=release
TARGET_BUILD_APPS=
TARGET_ARCH=arm
TARGET_ARCH_VARIANT=armv7-a-neon
HOST_ARCH=x86
HOST_OS=linux
HOST_OS_EXTRA=Linux-3.0.0-25-generic-x86_64-with-Ubuntu-11.10-oneiric
HOST_BUILD_TYPE=release
BUILD_ID=OPENMASTER
OUT_DIR=out
============================================
我用
guohai@KNIGHT:~/dev/src/android/git/panda$ make -j16
编译花了2个多钟头,偶中途去了趟超市,做了顿饭,整个ROM才编译完成,千万不要傻傻的等哦,找点别的事情干干(当然啦,偶尔过来看看有没有什么意外情况出现build failure是可以的,我已经build很多遍了,所以机器上的编译环境一般没有什么问题,比较放心)
直到build完成,出现
Creating filesystem with parameters:
Size: 268435456
Block size: 4096
Blocks per group: 32768
Inodes per group: 8192
Inode size: 256
Journal blocks: 1024
Label:
Blocks: 65536
Block groups: 2
Reserved block group size: 15
Created filesystem with 970/16384 inodes and 41312/65536 blocks
+ ‘[‘ 0 -ne 0 ‘]’
Install system fs image: out/target/product/panda/system.img
out/target/product/panda/system.img+out/target/product/panda/obj/PACKAGING/recovery_patch_intermediates/recovery_from_boot.p maxsize=274053120 blocksize=4224 total=167387526 reserve=2770944
DroidDoc took 1181 sec. to write docs to out/target/common/docs/doc-comment-check
这样我们需要的ROM就准备好了
二,Flash ROM
1、未插入电源的状态下,拔掉SD卡
插入USB线,串口线(可选)
连接电源
2、执行
guohai@KNIGHT:~/dev/src/android/git/panda/device/ti/panda$ ./usbboot2 ./bootloader.bin
using built-in 2ndstage.bin
waiting for OMAP44xx device…
reading ASIC ID
CHIP: 4440
IDEN: 0000000000000000000000000000000000000000
MPKH: 0000000000000000000000000000000000000000000000000000000000000000
CRC0: 229e85ba
CRC1: 00000000
sending 2ndstage to target… f0030002
waiting for 2ndstage response…
sending image to target…
looks everything is ok…
注:最后这一句”look everything is ok…”是我自己加在omap4boot源码里的,这里使用的usbboot2就是omap4boot编译出来的
Putty会给出如下反馈
见图01-usbboot.png
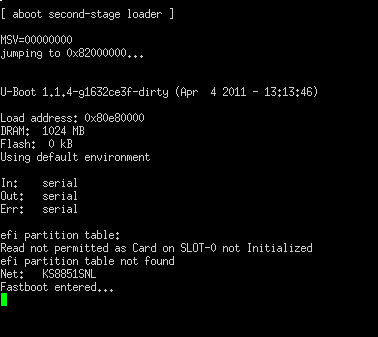
最后一句是Fastboot entered…
就表明板子已经进入了fastboot mode
3、插入SD Card
执行
guohai@KNIGHT:~/dev/src/android/git/panda/device/ti/panda$ fastboot oem format
…
OKAY [ 0.656s]
finished. total time: 0.656s
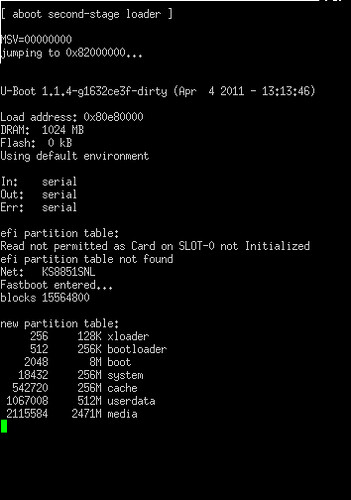
Putty会给出如下反馈
见图02-fastboot-oem-format.png
guohai@KNIGHT:~/dev/src/android/git/panda/device/ti/panda$ fastboot flash xloader ./xloader.bin
sending ‘xloader’ (23 KB)…
OKAY [ 0.007s]
writing ‘xloader’…
OKAY [ 0.321s]
finished. total time: 0.328s
见图03-fastboot-flash-xloader.png

guohai@KNIGHT:~/dev/src/android/git/panda/device/ti/panda$ fastboot flash bootloader ./bootloader.bin
sending ‘bootloader’ (161 KB)…
OKAY [ 0.015s]
writing ‘bootloader’…
OKAY [ 0.384s]
finished. total time: 0.399s
见图04-fastboot-flash-bootloader.png

验证板子目前是否处于fastboot mode
guohai@KNIGHT:~/dev/src/android/git/panda/device/ti/panda$ fastboot devices
7024000200000001 fastboot
guohai@KNIGHT:~/dev/src/android/git/panda/device/ti/panda$ fastboot erase cache
erasing ‘cache’…
OKAY [103.063s]
finished. total time: 103.063s
guohai@KNIGHT:~/dev/src/android/git/panda/device/ti/panda$ fastboot flash userdata
sending ‘userdata’ (10428 KB)…
OKAY [ 0.585s]
writing ‘userdata’…
OKAY [ 4.786s]
finished. total time: 5.372s
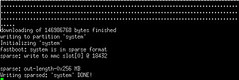
见图05fastboot-erase-cache_flash-userdata.png

guohai@KNIGHT:~/dev/src/android/git/panda/device/ti/panda$ fastboot flashall
——————————————–
Bootloader Version…: U-Boot 1.1.4-gedeced79
Baseband Version…..:
Serial Number……..: 7024000200000001
——————————————–
checking product…
OKAY [ 0.001s]
sending ‘boot’ (3750 KB)…
OKAY [ 0.224s]
writing ‘boot’…
OKAY [ 1.993s]
sending ‘recovery’ (4096 KB)…
OKAY [ 0.237s]
writing ‘recovery’…
OKAY [ 2.113s]
sending ‘system’ (163150 KB)…
OKAY [ 9.107s]
writing ‘system’…
OKAY [ 58.941s]
rebooting…
finished. total time: 72.623s
见图06-flash-all.png 07-flash-all-done.png

到此完成,板子自动重启
稍等一会儿就出现ANDROID的Logo啦
另外据说PLATFORM_VERSION=4.0.9.99.999.9999.99999
就是Jelly Bean,进去之后发现真的就是Jelly Bean
以前编译ICS也是这一样的步骤,只是代码不同,打的patch不同
要参观多图(非高清),请移步http://www.flickr.com/photos/46848122@N08/sets/72157631476114706/